Operation method: 1, ground resistance measurement 1. When storing and keeping this watch, should pay attention to the ambient temperature and humidity, should be placed in a dry and ventilated place is appropriate, to avoid moisture, should prevent acid and alkali and corrosive gases.
Blister
punching machine
Blister punching
machine specifications
1.Smooth
movement, less consumption
Blister Punching Machine working principles
Using the advanced crank connecting rod
mechanism. By the motor drives the flywheel, the flywheel through shaft and
pinion drive big gear, crankshaft, gear through the clutch to drive the crankshaft
drives the connecting rod to make the slider to work.
Blister punching machine applications
This is
double column cutting machine, is suitable for the single layer or layers
of leather, plastic, artificial leather, textiles and other materials forming
blanking, as long as the match to be on the molding box knife, can get various
shapes of products, such as soles, shoes, handbags, gloves, toys, clothing,
blister, plastic and craft products.
Blister punching machine features
1. The machine has compact structure, smooth
movement, less consumption, even platen movement using a crank rod and health institutions clutch control, convenient operation, safe and reliable.
2. The feet or hands button operation
pressure plate, ensure the safety of operators.
3. The intermittent type single stroke
operation, the emergency stop device, to ensure safe operation.
4. Automatic lubricating system ensures
machine precision and enhance machine durability.
5. Can be adjusted according to the different
height of products any pressure plate spacing.
Blister Punching Machine Blister Punching Machine,Punching Machine For Blister,Plastic Blister Punching Machine,Punching Machine For Plastic ShenZhen Hengxing Machinery Factory , http://www.szchxjx.com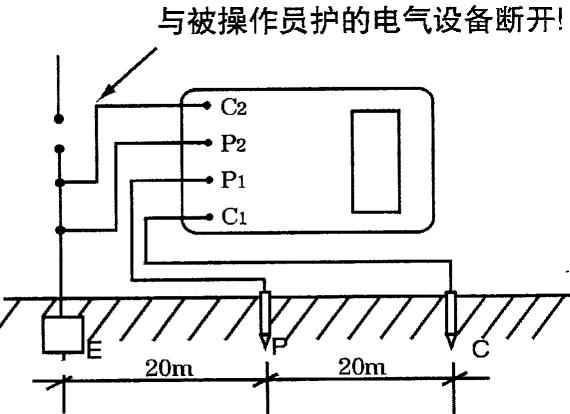
According to the ground electrode E (C2, P2) to be tested and the potential probe P1 and current probe C1, they are separated from each other by 20 meters in a straight line, so that the potential probe is in the middle position between E and C, and the probe is inserted into the earth as required.
Use a special wire to connect the ground resistance instrument terminals E (C2, P2), P1, and C1 to the position of the probe.
Turn on the ground resistance meter power switch "ON", select the appropriate gear lightly press the button indicator lights, the value of the meter LCD display is measured ground resistance.
2. Soil resistivity measurement 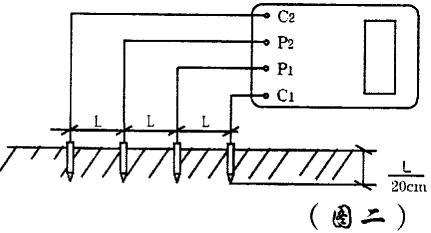
During the measurement, insert four probes along the straight line in the soil to be measured, and make the spacing between the probes equal. The distance between each distance is L. The depth of the probe is required to be L/20cm, and the distance from the probe is C1, P1 respectively. Each terminal of P2 and C2 is connected with four probes. If the resistance meter measures resistance R, the soil resistivity is calculated as follows:
Ф = 2πRL Ф - soil resistivity (Ωm), L-distance between probe and probe (m), R-resistance reading (Ω)
The soil resistivity measured by this method can be approximated as the average soil resistivity embedded in the area between the probes.
The probes used to measure the earth resistance and soil resistivity are generally aluminum alloy pipes or round steel with a diameter of 25 mm and a length of 0.5 to 1 m.
Maintenance and precautions:
2. When measuring the protective grounding resistance, be sure to disconnect the electrical equipment from the power supply. When measuring the grounding resistance less than 1Ω, they should be connected to the grounding body with dedicated wires respectively. C2 is on the inside of the outside P2 as shown in the figure. 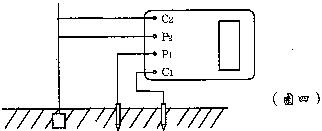
3. When measuring the grounding resistance of a large grounding grid, it cannot be measured by the general wiring method. The buried plugging point can be selected according to the provisions in the ammeter and voltmeter measurement methods.
4, measuring the ground resistance is best repeated in different directions measured 3 to 4 times, take the average.
5, the instrument with rechargeable battery pack. When the rechargeable battery voltage in the unit is lower than 7.2V, the undervoltage symbol “â†â€ is displayed in the upper left corner of the meter. Promptly charge the battery pack in time for about 8 to 14 hours. When the meter is not used for a long time, it should be charged and maintained regularly.
2.Suitable for single layer or layers of leather, plastic
3.Easy to operate and maintain


Lightning digital grounding resistance tester how to use?